So I have waded into the world of digital scrapbooking. I was almost certain I would regret it. I didn't. The ease and convenience of not worrying about whether I screwed up my measurements after I cut the $1.25 piece of paper is one major draw. The fact that my kids cannot get into my 'tools', 'paper' or 'embellishments' is another. Aside from that the one thing that made me slap my head in self-annoyance was this - the freebies!!
I have discovered that just about every site that sells or deals with digital scrapbooking stuff has freebies. And we're not talking about last years disaster design that no one liked. We're talking honest-to-goodness cutness. I found myself swearing at all the money I wasted on paper and supplies when the freebies were out there for the taking. Because, when did paper scrapbooking ever give away whole sets of matching paper, accessories and instructions on how to do it? Maybe if you were doing a make 'n take at the local scrapbooking convention or if you happen to win the grand prize at some drawing or contest.
So you are wondering, where can I get some of this myself? Well, let me tell you some of my favorite sites I've found.
Shabby Princess -- this was my favoite site. Not only is all of her stuff adorable, her freebies are amazingly cute! And there is a lot to choose from. This is not to mention the step by step video instructions on how to digital scrapbook under her Tutorials section. And we're not just talking 'click ctrl-x to paste your image' stuff. She is quite detailed and answers questions the green noob ( <----me) would have about it. Then she goes a step further with instructions on how to do things like make 'brushes' in PhotoShop Elements and CS2/3/4. I could go on forever on how much I enjoyed her site and found all the info on it helpful and detailed.
Two Peas in a Bucket -- gotta send props out to one of the oldest online scrapbooking communities out there. Pretty much anything you need to find from fonts to ideas to, of course, freebies can be found here. Not only that but the devoted community is a great place to get pointers from those that have been there and done that.
Here are some other sites that have cute or useful stuff:
Simply Clean Digiscraps -- cute cute stuff
Urban Fonts -- a good place to find fun fonts that are free. A very large collection and not many search options so you'll be doing a lot of page scanning. This is also a good place to find things like comic book fonts.
I'm sure there are more out there, I just haven't taken the time to find them - but I will!! But this is a good starting place for those that want to take that leap into the digiscrapping world.
Thursday, May 14, 2009
Sunday, March 29, 2009
Digital Scrapbooking Temptation
So, I'd like to think I was a purist. I'd like to be able to say that the loving consideration, work hours and skill it takes to make handmade cards and scrapbook layouts is the best way to infuse love into a scrapbook. But unfortunately, I like things to get done fast and easy. Its why I'm more drawn to card making than scrapbooking as a rule. Cards are faster projects and require me to use less of my stock to make. But cards do not a heirloom scrapbook make.
So, of course, there has been plenty of those digital scrapbook program sales people at the scrapbooking expo. I find myself drawn in a big way to drag-n-drop pictures, 'paper' and 'accessories' stored on my hard drive instead of my closet, and if you do something you don't like, you can just redo it without worrying about ruining the $2-a-sheet paper you bought. Also, I havne't looked into the capabilities of those programs yet but I imagine even if your scrapbook layouts file format isn't compatible with most picture viewing software, you can usually dump it into Photo Shop or Paint Shop and quick as a wink, convert those files to .jpg or .gif formats. Those are all things that have me at hello.
But here are my problems with digital scrapbooking. Have you ever seen a printed sheet of digital scrapbooking? Well, no offense to those that love digital scrapbooking, but they look fake. Some of the ones I've seen just look thrown together. There is also something very unnerving about a scrapbook page that isn't, well, 3-D. It also seems to me that the expense of digital scrapbooking rivals that of regular scrapbooking, no matter how you slice it. First you pay for the program, then if you don't like any of the papers or accessories included in the program, you can buy some from some enterprising gal who is really awesome at Paint Shop. From all accounts this type of paper buying is just as addicting as the wood pulp stuff. Then there is the cost of printing this paper. If you choose a printer that is out of state or even out of city, the cost of printing is nothing compared to shipping 12 x 12 paper. Believe me, I know. A couple of my layouts that I sold cost me a pretty penny to send. It makes it so not appealing.
I have come to the conclusion that if I decide to delve into the digital scrapbook area, there are just some things I won't do without. I think I would still accessorize my pages. I'm pretty confident enough in my vision for the way I want a page to turn out that by the time I got my page from the printers, I could accessorize it with a fair amount of confidence. I would refuse to buy digital papers that look cheesy or cheap. I've seen enough really good background designs to know there are good ones out there. The draw of actually having several finished scrapbooks done and sitting on a shelf somewhere is a dream of mine. I may have to just pony up for a good digital program and just do it my way.
Saturday, March 28, 2009
How I Learned to Scrapbook
No consultant for any company taught me to scrapbook. In fact, I think some would say Close To My Heart is responsible for what I do know about scrapbooking. They would be wrong. Ok, so I learned a lot about cardmaking from Close To My Heart's Card Confidence program taught me the foundations of card making, and especially layout design.
The thing I mainly attribute the scrapbooking I do is trial and error. Now I'm sure you're saying, "Well duh!" Let me explain. When I first started scrapbooking, I would flip through the magazines dedicated to scrapbooking or the Idea Books and say to myself "I couldn't make anything like that." Then I'd put them back and try something out of my own brain, and get frustrated because it didn't look good to me, and it didn't look 'professional'. I'm self-critical like that. Then it dawned on me one day that the reason the magazines and Idea Book had pictures of the projects in them is so that you could copy what the person had done (another "Well, duh!" moment). As I started shamelessly copying the projects in the book and through trial and error, I learned most of what I know now.
Here are some 'ah-hah's' that helped me overcome my self-criticism:
Ah-hah #1 - You Can't Do It Wrong - if it looks good to you, comparing how 'good' it is to other people's work will just frustrate you (this can be applied to just about anything in life). Sure, there's some work that is more pleasing to look at to other people but may not be everyone's cup of tea. Plus, if you never try anything new or give yourself permission to expirment, you'll never know what you could have learned.
Ah-hah #2 - Never Glue Anything Down Until Its Done - This is gospel for me when I'm card making or scrapbooking. I've had too many times where I starting doing one thing, glued it down, got inspiration to do something else, like wrapping a ribbon around a framing mat, and had to either start over again or pull it up. You'll save yourself a ton of headaches by just waiting until your satisfied to glue it!
Ah-hah #3 - Let the Pictures Be Your Guide - One of the secrets of professional scrapbookers is to coordinate the paper with colors contained in the photo. Its not too different from choosing make up or wearing clothes. You have a picture of a cheerleader in her cute blue and white uniform, but you pick oranges and browns for your paper and ink schemes and something's not going to look right, no matter how cute the paper is. Another tip in this section that will ease your hair-pulling tendancies is choose your photos in advance. Some groups will look better together than others, so depending on how many photos you want on a particular layout, you can better determine the layout needed. Example: You have a set of sequential pictures of your son driving off the diving board for the first time. You're going to want to pick a layout that allows for a lot of small photos.
Ah-hah #4 - Mistakes Are Your Friends - This may sound like I'm going back on everything thing I've encouraged you to do so that you can avoid frustration, but really its the fastest way to 1) learn what not to do and 2) create something totally unexpected.
Like the student learning to paint in the Renaissance, copy your favorite scrapbooker again and again until the 'click' of understanding comes. Learn your craft - study magazine and book as much as you can. Join a scrapbooking group - more experienced scrapbookers can give you advice or hints or even tell you something you never even thought of. Eventually, even someone as color challenged as me, you will be able to sit at a table full of supplies and relish the challenge of creating something not only memorable but beautiful.
Sunday, January 18, 2009
The Benefits of Mini-Album Making
One thing that people share who start scrapbooking can be a sense of panic. There is so much! So many papers, so many colors, so many themes, so many layouts. I struggled for a couple of years to get to know my scrapbooking style. What I found is that, for me, the smaller, the better. I have also found that starting out smaller also helps newbies get a sense of what can work on a larger scale - give them a boot up, so to speak.
The mini-album is a wonderful way to dip your big toe in the pool of scrapbooking. The scale is definitely smaller. The time it takes to put one together is shorter, especially if you have a project sheet. Below is an example of an accordion album I made for Christmas a couple of years ago:

The measurements of the cover were 3 1/2 x 3 1/2 inches. The inside accordion pages were 3x3 inches. Notice the cover of the album is fairly simple. A stamped snowflake image that has been matted by a piece of red cardstock. The paperboard that comprised the front and back covers were covered by matching green polkadot paper. Then two pieces of grosgrain ribbon were attached to each side so that the book could be closed with bows. It took me a total of 15 minutes to put together the outside covers.

The inside of this book has six different page layouts. I like a little variety. However, I have seen just as cute or cuter books done with the same layout for every page. Its personal choice and depends a great deal on time and resources. Notice, again, that the layouts on the pages are not elaborate. They include simple embellishments like stamped paper, brads, and stamped images that are cut out and attached to the corner of the picture mats. The accordion album is so versatile. They can be made in any size as long as you have the paper for it, and can have as many pages as you want.

The above example is another one of my favorites for gifts. The paperbag album is simply what it says - made from brown or white lunch paperbags. They are folded in half, decorated with paper and then bound by ribbon or metal rings.

I usually use three paperbags which yields a five layout book plus three surprise pull outs. As you can see, the principles are the same - smaller scales and simple embellishment. The benefit of the paperbag album over the accordion album is, because the paper you are decorating is a little more sturdy and doesn't require you to fold it together, you can decorate or embellish it a bit more heavily.

The surprise pull outs are a favorite part of mine for the paperbag album. It it not necessary to use the open ends of the paperbags to put in an insert. They can be closed and ribbons and other things can be used to decorate the edge of the book. But its so much fun for someone to pull on the ribbons and get a bonus picture or three. All you had to do was cut out a few extra pieces of cardstock and attach some ribbons on the ends.
There are a few more types that I know of, such as the star book and tag book. I don't have pictures of ones I did but if you click on the links, you'll see examples others have done. In short, mini-albums are perfect for busy moms who'd like to get a project done in one night or a quick gift for faraway family and friends when they can't be there for things like birthdays, weddings, baptisms, or graduations.
Tuesday, January 31, 2006
February Workshop - Stamped Candles
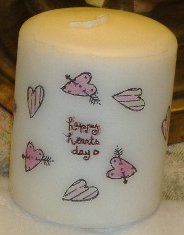
Stamped Candles!
So much fun and so easy to do. I did this candle last night as the display sample to use on Feb. 21st. I am also going to experiment using an embossed image on a darker-color wax candle. My fear is that while these cute, simple stamped images do well on lighter colors, they would lost or too light for darker colors, like red or green. However, with embossing it might be different. The only thing that might ruin it would be that the embossing powder would melt again after trying to apply it to the candle with your heat tool. We'll see and I'll update my progress here.
Things I've Learned as a New Consultant
Well, my open house didn't go too badly, money wise. In fact, I had twice as many people there as I did my JumpStart. As far as function-wise, I consider my JumpStarts and Open Houses both disasters.
But the thing is I have learned a ton about holding Gatherings from only having two. A few pointers I've learned:
1) When doing your Idea Book walk-through, don't try to introduce the entire book. It will bore people. They are anxious to look through it themselves. Instead, go through and pick out things that interest you. I used my consultant wish-list as a guide. I pointed out Cherish, the Lvl 1 kits some of my favorite stamp sets, and emphasized the Stamp Of The Month.
2) On your first Gathering keep things simple! Don't try to do an entire page unless you really feel confident about creating an entire one, and have the resources to pay for all the materials. Do a touch-n-take instead, a simple tag using the products you got with your consultant kit. Search the Artwork boards for ideas, or look through the CTMH website, they have ideas for artwork for new consultants. I have even gone on the web and looked for ideas there too and envisioning them with CTMH products. I've gotten some fabulous ideas using both these methods.
3) Provide excellent customer service even when you make a mistake. This was a big one on my Jumpstart. My bank did not deposit the money for my order properly and so instead of the promised 10 days to get the order back to my customers it took over two weeks. What I found helped was always keeping my customers informed when new information was available. I'm sure they were a little upset because they had hoped to have their products sooner but at least they were trying to knock down my door enraged.
I have another gathering on Feb. 9th and I hope to take all that I've learned so far and improve on my delivery.
Friday, January 20, 2006
Spring Idea Book Open House
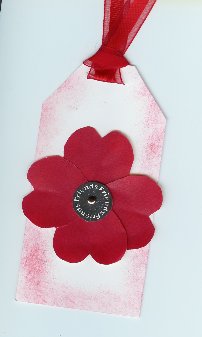
Tomorrow is my big day! My very first Gathering done by myself! I hope to heaven that this is a larger party than my Jumpstart, ie more than just my family show up. I am determined to have fun otherwise I would have wasted all the time and effort into getting ready for it. I also hope that if nothing else, that people will want to book a party from me. We'll see. Like a blessing from heaven, I received an email from my 4th upline this morning that had this fabulous Idea Book walkthrough that is perfect for my Gathering tomorrow. I also have almost all of my display boards and items done for the thing too. I'll have to scan the take-out box I'm going to do - soooo cute! Below however is the tag that we will be doing tomorrow. Pretty cute if I say so myself.

So here's to luck and hoping that everything works out, at least somewhat, like I plan.
So here's to luck and hoping that everything works out, at least somewhat, like I plan.
Saturday, January 07, 2006
At home and loving it
I am at home!! I love being here every day with Maddy. I wake up when she wakes up and then we hang out all day. She is a slightly demanding baby so I don't get much done around here much to the consternation of my husband but it is so great to be the one taking care of her. I have been on a downward spiral of motivation since I left my job at the beginning of December. I have not done much since as far as scrapbooking. However, I am going to have an Open House at my apartment complex on the 21st and I hope that it is a big sucess. Success meaning some orders, a few booking for partys and at least 10 gals to sign up for my monthly workshops starting in February. Please bless!!
Here is one way cute thing I managed to complete right before Christmas:
Here is one way cute thing I managed to complete right before Christmas:

It's called Snowman Soup. It was inexpensive and I used the stamp from the Frosty Friends set.
I have also created a website for my business which I am including in my Links section but can be found at:
www.geocities.com/scrappywheels
It's got all my information, including important dates like the upcoming Open House and Workshops. I'm planning on including pictures of the things we'll be doing in the workshops so that the people that come will have a visual of the thing to be made to get them excited.
Subscribe to:
Posts (Atom)